
I'm not sure how many people still read this blog, since my updates have been nonexistant for what seems like forever. But for those who may see this pop up in their feed reader, or who check in from time to time, you can find me on my new blog, where I'll be consolidating all things crafty, foodie and photography all in one place.
So please, come on over and visit me at Blissful Domesticity! I promise I'll try harder to keep things interesting over there. :)
Thursday, August 18, 2011
Thursday, February 24, 2011
The Money Pit
My husband jokingly refers to my craft corner as 'the money pit', because there is no end to the neat toys I want to play with in my crafty ventures. And I have an awful lot of stuff too - bins full of yarn, stamps, inks, ribbons... I could spend hours listing all the stuff I have, and all the stuff I don't have but would like to get. Every time he sees me surfing a crafty site, I know he cringes and wonders what it's gonna cost.
So, I made a deal with him: he won't complain about my crafty purchases if I prove that I can 'earn' them by actually completing projects. These can be as small as a single card, or bigger organizational stuff, too. I'm essentially paying myself for using up my supplies, in the hopes of curbing what can very quickly become out-of-control spending.
Here's an example of what I'm paying myself:
- A card: $1
- 3D item: $2-5, depending on complexity
- Organizational project: $2-5
- Granny square (for an afghan project): $0.50
- Photographing & blogging a project: $1
- Completing a challenge project: $1
The list is a bit longer than that, but that's a start. So far, I've accumulated a little over $25 in my "craft & spend" credits, and as I get more done and actually share what I've made, I'll earn some more. Right now my goal is to craft enough to justify a Stampin' Up order before Sale-A-Bration ends at the end of March! Once I have the energy to redo my blog's template, I'll stick a widget on the sidebar so I can keep track of what I've earned and spent.
And now, off to work on something! I need to earn some more spending money!
Labels:
general blabbery


Sunday, February 13, 2011
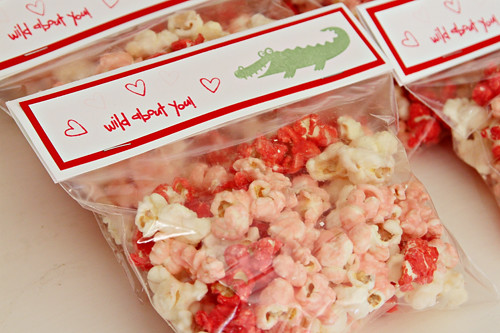
Candy Coated Popcorn
My daughter's preschool class is having a valentine's day party tomorrow. My plan was to send little marshmallow pops for her school friends, but those hopes were dashed last night when the only marshmallows I could find in the house were grotesquely misshapen. There was not a hope in hell that they would look at all good. I resigned myself to just providing little cards for her friends, until I remembered something I'd seen on a blog a few days earlier. This Blessed Nest posted lovely candy-coated popcorn-and-m&ms treat bags. I just so happened to have Wilton candy melts in my pantry in a rainbow of colours, so I adapted her idea a little bit for what I had in my pantry.

Super Easy Candy Coated Popcorn
(adapted from This Blessed Nest)
Popcorn
Candy Melts in desired colours, ~1 oz per generous cup of popped popcorn
Salt (optional)
Pop your popcorn. Place in a large bowl.
In a double boiler or a heatproof bowl over a pot of boiling water, melt candy melts. Drizzle candy melts over popcorn, and toss to coat. Sprinkle a little salt as you toss if you like your popcorn salty & sweet.
Spread popcorn on a parchment-covered baking pan, and let sit for half an hour or so, until candy coating has set. Break apart gently with your hands, since the pieces will have stuck together.

The tags are also homemade - now that my craft area has been reorganized, I was able to find exactly what I needed to make these cute little tags, the perfect size for ziploc sandwich baggies! I used all stuff from Stampin' Up - Whisper White & Real Red cardstock, Wild Wasabi, Real Red & Pink Pirouette ink, and stamps from Wild About You, and Goody Goody Gumdrops.
Super Easy Candy Coated Popcorn
(adapted from This Blessed Nest)
Popcorn
Candy Melts in desired colours, ~1 oz per generous cup of popped popcorn
Salt (optional)
Pop your popcorn. Place in a large bowl.
In a double boiler or a heatproof bowl over a pot of boiling water, melt candy melts. Drizzle candy melts over popcorn, and toss to coat. Sprinkle a little salt as you toss if you like your popcorn salty & sweet.
Spread popcorn on a parchment-covered baking pan, and let sit for half an hour or so, until candy coating has set. Break apart gently with your hands, since the pieces will have stuck together.
The tags are also homemade - now that my craft area has been reorganized, I was able to find exactly what I needed to make these cute little tags, the perfect size for ziploc sandwich baggies! I used all stuff from Stampin' Up - Whisper White & Real Red cardstock, Wild Wasabi, Real Red & Pink Pirouette ink, and stamps from Wild About You, and Goody Goody Gumdrops.
Subscribe to:
Posts (Atom)
