I'm not sure how many people still read this blog, since my updates have been nonexistant for what seems like forever. But for those who may see this pop up in their feed reader, or who check in from time to time, you can find me on my new blog, where I'll be consolidating all things crafty, foodie and photography all in one place.
So please, come on over and visit me at Blissful Domesticity! I promise I'll try harder to keep things interesting over there. :)
Thursday, August 18, 2011
Thursday, February 24, 2011
The Money Pit
My husband jokingly refers to my craft corner as 'the money pit', because there is no end to the neat toys I want to play with in my crafty ventures. And I have an awful lot of stuff too - bins full of yarn, stamps, inks, ribbons... I could spend hours listing all the stuff I have, and all the stuff I don't have but would like to get. Every time he sees me surfing a crafty site, I know he cringes and wonders what it's gonna cost.
So, I made a deal with him: he won't complain about my crafty purchases if I prove that I can 'earn' them by actually completing projects. These can be as small as a single card, or bigger organizational stuff, too. I'm essentially paying myself for using up my supplies, in the hopes of curbing what can very quickly become out-of-control spending.
Here's an example of what I'm paying myself:
- A card: $1
- 3D item: $2-5, depending on complexity
- Organizational project: $2-5
- Granny square (for an afghan project): $0.50
- Photographing & blogging a project: $1
- Completing a challenge project: $1
The list is a bit longer than that, but that's a start. So far, I've accumulated a little over $25 in my "craft & spend" credits, and as I get more done and actually share what I've made, I'll earn some more. Right now my goal is to craft enough to justify a Stampin' Up order before Sale-A-Bration ends at the end of March! Once I have the energy to redo my blog's template, I'll stick a widget on the sidebar so I can keep track of what I've earned and spent.
And now, off to work on something! I need to earn some more spending money!
Labels:
general blabbery


Sunday, February 13, 2011
Candy Coated Popcorn
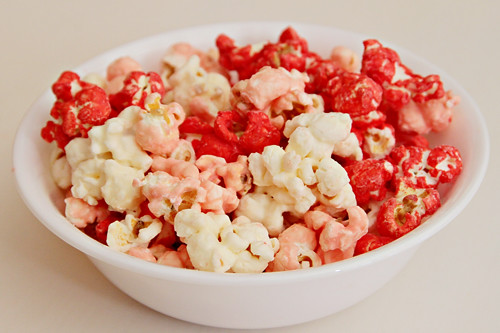
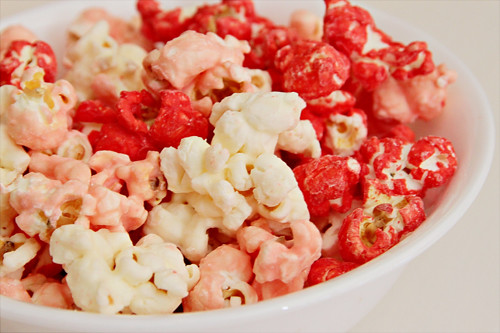
My daughter's preschool class is having a valentine's day party tomorrow. My plan was to send little marshmallow pops for her school friends, but those hopes were dashed last night when the only marshmallows I could find in the house were grotesquely misshapen. There was not a hope in hell that they would look at all good. I resigned myself to just providing little cards for her friends, until I remembered something I'd seen on a blog a few days earlier. This Blessed Nest posted lovely candy-coated popcorn-and-m&ms treat bags. I just so happened to have Wilton candy melts in my pantry in a rainbow of colours, so I adapted her idea a little bit for what I had in my pantry.
Super Easy Candy Coated Popcorn
(adapted from This Blessed Nest)
Popcorn
Candy Melts in desired colours, ~1 oz per generous cup of popped popcorn
Salt (optional)
Pop your popcorn. Place in a large bowl.
In a double boiler or a heatproof bowl over a pot of boiling water, melt candy melts. Drizzle candy melts over popcorn, and toss to coat. Sprinkle a little salt as you toss if you like your popcorn salty & sweet.
Spread popcorn on a parchment-covered baking pan, and let sit for half an hour or so, until candy coating has set. Break apart gently with your hands, since the pieces will have stuck together.
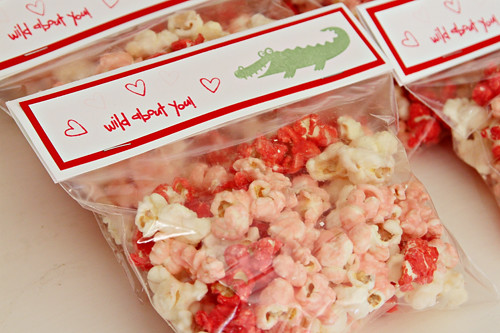
The tags are also homemade - now that my craft area has been reorganized, I was able to find exactly what I needed to make these cute little tags, the perfect size for ziploc sandwich baggies! I used all stuff from Stampin' Up - Whisper White & Real Red cardstock, Wild Wasabi, Real Red & Pink Pirouette ink, and stamps from Wild About You, and Goody Goody Gumdrops.
Super Easy Candy Coated Popcorn
(adapted from This Blessed Nest)
Popcorn
Candy Melts in desired colours, ~1 oz per generous cup of popped popcorn
Salt (optional)
Pop your popcorn. Place in a large bowl.
In a double boiler or a heatproof bowl over a pot of boiling water, melt candy melts. Drizzle candy melts over popcorn, and toss to coat. Sprinkle a little salt as you toss if you like your popcorn salty & sweet.
Spread popcorn on a parchment-covered baking pan, and let sit for half an hour or so, until candy coating has set. Break apart gently with your hands, since the pieces will have stuck together.
The tags are also homemade - now that my craft area has been reorganized, I was able to find exactly what I needed to make these cute little tags, the perfect size for ziploc sandwich baggies! I used all stuff from Stampin' Up - Whisper White & Real Red cardstock, Wild Wasabi, Real Red & Pink Pirouette ink, and stamps from Wild About You, and Goody Goody Gumdrops.
Thursday, June 4, 2009
Silks, Beautiful Silks!
My silk samples are finally finished! This is what I have been pouring all of my time and energy into as of late. As some of my readers may know, I am hoping to make a little extra cash by offering hand-dyed playsilks - 30x30 inch silk scarves with hand-rolled hems, perfect for little hands to use as a superhero's cape, a cowboy's bandanna, a princess' skirt. The only limit is the imagination!
The silks will be available individually, in pre-selected sets of three or six, or in custom batches to suit your individual desires. You can choose from these themed sets below, or contact me for a custom order, choosing colours from the entire palette. Please note that as the silks are hand-dyed, some variations in colour on the silk are natural, and beyond my control. Each silk is unique!
The details: 30x30" 100% habotai silk scarves with hand-rolled hems, dyed in small lots to ensure vivid colours. All dyes are non-toxic, and silks are washed before shipping to remove as much excess dye as possible. Contact me at smathie (at) gmail (dot) com for pricing, shipping information, and any other information.
Here are the sets available:

Rainbow Fun: Very Cherry, Orange Peel, Lemon Drop, Emerald Isle, True Blue, Wild Grape

Autumn Breeze: Chocolate Kiss, Antique Ruby, Pumpkin Pie

Night Sky: Stroke of Midnight, Wild Grape, Sapphire Springs

Land & Sea: Chocolate Kiss, Emerald Isle, Robins Egg

Ice Cream Sundae: Chocolate Kiss, Tickled Pink, Fresh Cream

Easter Egg: Tickled Pink, Robins Egg, Key Lime

Pretty as a Princess: Wild Grape, Tickled Pink, Fresh Cream

Ocean View: Emerald Isle, Robins Egg, Sapphire Springs

Morning Glory: Desert Sunrise, Orange Peel, Lemon Drop

SuperKid!: Very Cherry, Lemon Drop, True Blue

 The whole palette (counter-clockwise from top left): Fresh Cream, Tickled Pink, Desert Sunrise, Very Cherry, Antique Ruby, Orange Peel, Pumpkin Pie, Lemon Drop, Key Lime, Emerald Isle, Robins Egg, True Blue, Sapphire Springs, Wild Grapes, Chocolate Kiss, Stroke of Midnight.
The silks will be available individually, in pre-selected sets of three or six, or in custom batches to suit your individual desires. You can choose from these themed sets below, or contact me for a custom order, choosing colours from the entire palette. Please note that as the silks are hand-dyed, some variations in colour on the silk are natural, and beyond my control. Each silk is unique!
The details: 30x30" 100% habotai silk scarves with hand-rolled hems, dyed in small lots to ensure vivid colours. All dyes are non-toxic, and silks are washed before shipping to remove as much excess dye as possible. Contact me at smathie (at) gmail (dot) com for pricing, shipping information, and any other information.
Here are the sets available:
Rainbow Fun: Very Cherry, Orange Peel, Lemon Drop, Emerald Isle, True Blue, Wild Grape
Autumn Breeze: Chocolate Kiss, Antique Ruby, Pumpkin Pie
Night Sky: Stroke of Midnight, Wild Grape, Sapphire Springs
Land & Sea: Chocolate Kiss, Emerald Isle, Robins Egg
Ice Cream Sundae: Chocolate Kiss, Tickled Pink, Fresh Cream
Easter Egg: Tickled Pink, Robins Egg, Key Lime
Pretty as a Princess: Wild Grape, Tickled Pink, Fresh Cream
Ocean View: Emerald Isle, Robins Egg, Sapphire Springs
Morning Glory: Desert Sunrise, Orange Peel, Lemon Drop
SuperKid!: Very Cherry, Lemon Drop, True Blue
The whole palette (counter-clockwise from top left): Fresh Cream, Tickled Pink, Desert Sunrise, Very Cherry, Antique Ruby, Orange Peel, Pumpkin Pie, Lemon Drop, Key Lime, Emerald Isle, Robins Egg, True Blue, Sapphire Springs, Wild Grapes, Chocolate Kiss, Stroke of Midnight.
Tuesday, April 28, 2009
Talk to me about selling...
I am so bad at this crafty blogging thing. I keep meaning to post, but do you think I remember to? Noooo. I've been busy working on crafty ideas to sell, so blogging about them isn't something I'm prepared to do while these thoughts are still under development. Once I have a plan, I will probably post a little more, but it's all still in development!
So, along that train of thought... anyone have any advice for a busy working mom who is eager to set out selling her wares? Thoughts on where you get your inspiration, how to handle competition, where to sell (own website? etsy? other?), how to set your price points, advertising, promos, custom orders vs stock on hand? Anything really, any input would be most welcome. Right now I'm looking at selling on etsy, but I haven't thought further ahead than that...
So, give it to me! I can take it. :D
Labels:
general blabbery
Sunday, March 29, 2009
Worm Wishes!
Good lord, has it really been almost three months since I updated last? Eek. I have had a lot of projects on the go, but really, none of them have been fit for blog posting. On top of that, my craft area is a royal disaster. I got a new sewing machine and table at the end of January, which required some re-organizing that turned more into a piling of things in different places. Not exactly great for encouraging the crafty flow! Anyway, my daughter was invited to a birthday party for one of her little friends, so I decided to whip together this adorable card for the birthday boy! Pretty much a CASE of this card, but with a few of my own touches. I really like the shape I got for the greeting - I just cut out circles and snipped the top and bottom off to get a neat shape! I probably would have used ovals, but I don't own those punches yet so this was good enough.

The ingredients:
- Paper: SU Close to Cocoa, More Mustard, Whisper White, Chocolate Chip DSP
- Ink: SU Bravo Burgindy
- Stamps: SU Bugs & Kisses
- Other: Misc ribbon, circle punches, dimensionals
The ingredients:
- Paper: SU Close to Cocoa, More Mustard, Whisper White, Chocolate Chip DSP
- Ink: SU Bravo Burgindy
- Stamps: SU Bugs & Kisses
- Other: Misc ribbon, circle punches, dimensionals
Labels:
cardmaking,
stamping
Sunday, January 4, 2009
Always My Valentine
For someone who hasn't celebrated Valentines Day since elementary school, I sure am into the v-day cards this year! I am not sure where all this inspiration is coming from. This one all started while I was organizing my multitude of Martha Stewart glitters. The Rose Quartz one just caught my eye, and I was determined to finally make a sparkly card. The rest just kind of fell into place! I am thinking of redoing this card with two hearts together, one just looks so lonely all by itself.

The ingredients:
- Paper: SU Ruby Red, Cameo Coral, Blush Blossom
- Ink: SU Ruby Red, Versamark
- Stamps: SU Always, Circle of Friendship
- Other: Martha Stewart lace-edge punch, Scallop circle punch, circle punches, Fiskars mini heart punch, SU Heat & Stick powder, Martha Stewart glitter in Rose Quartz.
Labels:
cardmaking,
stamping
Subscribe to:
Posts (Atom)
